Pages

5.30.2013

Thrifty Thursday: Cradle & a Chair

This week I found a few little treasures.  I ventured out to the Goodwill in Fountain Hills, which is about a 20 minute drive for me.  Although it was a small store, I was pleased with the purchases I made!

First is this adorable little doll cradle!  How cute is that!  I mean, how cute COULD it be?! It is solid wood and cost $7.00
I'm not really sure why I HAD to have it.....ya know......since I have 3 boys!  Funny how I'm drawn to little girl things!

Here she is before I transformed her:


And here she is now:  SO PRETTY!

I knew I wanted to paint her a pale pink (since I don't get to use pink too often)
But I just mixed some stuff up that I had to get this color.
I had some pale pink acrylic paint, so I just mixed some of my Polar White to it until it was as pale as I wanted it.
Then the usual Sand and Antique

Now I just have to figure out what to do with her! ha

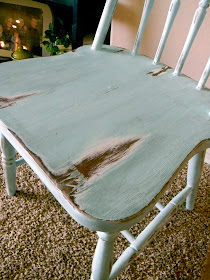
I also found this antique chair.  I remember my Grandparents having one just like it when I was young.
So I couldn't resist!
It was also $7.00! 

The chair was pretty glossy, and I wanted some white to show through when distressed, so I decided to prime instead of using my chalk paint.  I used Cover Stain so I didn't need to sand, then used this Spa Blue color I found at Hobby Lobby:

So here you can see the white underneath:


I am very happy with the color and the way it turned out!
It matches perfect in my family room!

Party Links:

5.28.2013

Pallet Signs

You know how I said I would tell you more about the pallet sign in my Laundry Room....well here it is! 
 I got on a huge kick and made a bunch with all the pallets I had lying around.  The one in my laundry room was just one of the many!  

I know I say this a lot, but these are super easy to make!  And honestly, you don't even need pallets!  You can go to Home Depot, pick up some lumber, have THEM cut it to size, and use that!  
If you like the beat up look, this is what you do:  Take a hammer, bang some nails in it, and then bang the wood to beat it up a little bit!  HA, its kinda fun!

Anyways...
After you have your wood (cut to size and number of planks you want), turn them over.
You will also need 2 thin pieces of scrap wood that are long enough to cross your plank wood
Like this:
 Take SHORT screws (less than 1") and drill one into each plank.  Be careful on this part so you don't split your wood

Now you are ready to paint
 I like to go easy on the paint so it looks more rustic

Then I take an Ink Pad and rub it all over the board, focusing on the 
edges and imperfections in the wood

 I used the same method as I did for my pedastal sign to transfer the lettering
Here is my Laundry Room sign:
When I finished the lettering, I took sandpaper and rubbed the lettering to distress it a little. 
 Next I drilled large holes in the top, and hung it with burlap ribbon
This is one I made for my baby's room:

On this one I did the lettering a little different:
First,  I printed the font and size I wanted onto cardstock.  I then cut them out and traced them with a pencil onto my board 
Next I chose my paint color, and filled in the lettering with paint....and I used a Q-Tip! (don't judge!)

Here's one I made for our room:


This is a small one I made for my Mom:


5.25.2013

Organizing my Accessories!

I FINALLY finished organizing my closet! Well.....for now anyways!

My biggest problem was my "accessories"! I've seen this idea all over Pinterest, and I actually had this board in our last house, which I used in my craft room.  But in this new house I didn't end up using it. So I figured I would give it a try for my jewelry.
At Home Depot you can find a variety pack of the hardware, which is what I used
The baskets I used for my headbands were the only things I had to buy separately for the board.
I painted my board (using Martha Stewart's Spanish Moss) because they are a dark, ugly brown!!

The thing I love most about this concept is that I can see everything that I have! So while I search through my clothes trying to find an outfit I can glance over at all my "accessories", and plan accordingly! Ha!

And here's the rest of my closet...not too exciting, but one thing I HATE is having my shoes on the floor! So I discovered these closet maid things at Walmart. How did I not know about these before?! But they definitely work for organizing shoes!
(They cost about $12...ouch! But worth it to me for certain things)
Does anyone have other fun closet organizing ideas?!

5.23.2013

Thrifty Thursday: Shelf Makeover

Today I'm going to show you how I turned this:

 Into THIS:
 All for about $8.00!

This ugly wood shelf cost me $1.99 at DI.  And I have to tell you, I have never gone to a thrift store and NOT found a shelf similar to this.  They are everywhere!  

I first started by removing those ugly wooden pegs, and filling the holes with wood filler

Next I mixed up my chalk paint using Valspar's Transit Pass (it's a neutral yellow)
When it was dry I sanded by hand.  I like to sand by hand on smaller projects.

Then I used Valspar's Antiquing Glaze (can you tell I like Valspar?!)
This stuff works really well at darkening the areas that have been sanded! Again, I use a damp cloth to wipe it off.  

When the iron stuff was on sale at Hobby Lobby, I picked out my 3 hooks and screwed them in!

And thats it!!! 
If you are wanting to try painting or have a project you are hesitant to paint, go to Goodwill, pick up a shelf like this one and give this little project a try first!  This is SO easy! And Cheap! And Cute!
Oh, and I've had some questions about my homemade Chalk Paint:
This is what I do:
Take about 2 TBSP Plaster of Paris
Add about 4 TBSP warm water (I add a little more if needed)
Mix until dissolved
Then add about a cup of paint (any paint) and mix WELL!

Link Parties:
Tater Tots & Jello: Weekend Wrap Up, Huckleberry Love

5.21.2013

20 Minute- 20 Dollar Blanket

You know these things? The Satin Blanket Binding?  
I LOATHE them! 
I have been sewing for many years and I still can't master them!  
But of course a baby blankie isn't the same without it.  My kids love them, and when I make them for other people they always request one with it.  
So I had to figure out how to get these things to work for me.


I am going to show you how you can use this satin blanket binding in a different way.
So Easy!
Takes about 20 minutes
Costs about 20 bucks (if you use minky on both sides, like I do)

First, gather your materials:
 You will need two coordinating fabrics (I prefer minky) and a package of the satin binding

*ok just a side not*
I always buy a yard of the minky fabric.  If you do, you can fold it in half and get exactly two good sized blankets out of it.  So it cuts out the "measuring" step

Cut your first fabric in half

 Then take your satin binding and line it up on the endge of the fabric.  You want to line it up with the open end of the binding (not the folded edge)

 Leave a few inches loose, then start sewing around the edge with a straight stitch.  I just line up the fabric edge with the edge of my presser foot.
*another note*
 you have not pinned anything at this point!

As you sew, take the binding and make small folds (or pleats) with it.  I don't measure, I do them randomly so it doesn't look so uniform.  I also do more for a girl blanket than I do for a boy one.

So it should look something like this as you sew along:

When you get to the corner, you want to do the same thing, only make about 3 folds, until the binding can line up with the next fabric edge


 Curve your stitching around the corner

 When you get to the end, cut off the excess, but leave a few inches.

Overlap the two loose edges

 Then fold it over, hiding both rough edges, and sew it down.  


Now your blanket should look like this:

Next, lay your blanket face down on your contrasting fabric, and pin in place.

 I always pin it with an inch or so extra room because minky always tends to creep, so it will give you a little wiggle room.

When you finish pinning, cut off the excess fabric

Go back to your sewing machine and line your presser foot up with your previous seam line.  This way you know your previous stitching won't show through.

When you get to each corner, lift it up to move all your pleats to the middle so you don't catch the end of one in your stitching.

 When you get towards the end, leave an opening big enough for you to flip the blanket inside out.
*I always double pin the spot for the opening, otherwise I ALWAYS sew it closed! You'd think I wouldn't have to always remind myself....but I do!

Clip your corners so they look like this, then flip your blanket inside out

Next you will need to sew your opening closed. 

I use a zig zag stitch, and I go around the entire blanket to give it a topstitch. 

You can skip this step, but I think it makes it look more finished.

Then, YOU'RE DONE!

You now have a beautiful baby blanket
with a satin edge!

 *another side note*
I have 3 boys, and have made one of these for each of them, which they love.
If you are worried that the edge looks too girly, let me tell you:
I have made and sold FAR more boy blankies like this than girl :)

Party Links:
Tater Tots & Jello: Weekend Wrap Up
Six Sisters Stuff: Strut your Stuff