Well, my younger sister is gone to Michigan so hopefully I'll be back to posting regularly!!!
But I am so excited to show you this bathroom makeover! This is my sister's master bathroom that we fixed up while I was there in Texas!
This is my favorite room that we did! I think it turned out GORGEOUS! We did so much to it though, so I'm going to split it into two posts.
For this one I'm going to show you what we did to the cabinets and the mirrors!
Here is her bathroom Before:
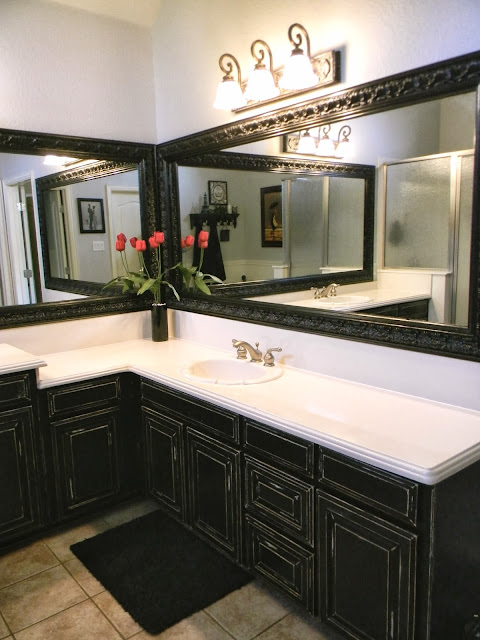
My sister wanted her bathroom to be black/white/grayish with red accents.
She also wanted a Paris theme.
So we started by painting the cabinets black, and distressing them:
We also painted and distressed her existing light fixtures because they had nice details, and I knew they would look awesome with a little bit of paint! haha!
Ok, now this is my FAVORITE part!!!
Look at these fancy mirrors! Aren't they amazing?! The Lowe's in my sister's town carried this awesome trim. It is actually crown molding, but it is made of a dense styrafoam! It was perfect for this project because it is lightweight!
We glued it directly onto her builder grade mirrors with silicone adhesive.
So we first cut it to length, then painted it the same black as the cabinets:
After it was glued onto the mirror we caulked the seams and touched up the paint

Seriously, what a difference! I love how it made the bathroom feel so elegant!! Do you want to know how much it cost to frame these two mirrors? (which are huge, by the way!)
$90!
We could have never replaced those mirrors for that price! Love it!
For Part II of this Master Bathroom Makeover I'll show you what we did to the tub...and a few other amazing little projects!!
Therena
Party Links:
From My Front Porch to Yours,
Shabby Nest,
Love of Family & Home,
Savvy Southern Style,
Oh My Creative,
By Stephanie Lynn,
Nifty Thrifty Things,
Life on Lakeshore Drive,
Naptime Creations,
Coastal Charm,
My Uncommon Slice of Suburbia,
Not Just a Housewife,
Domestically Speaking,
I Should be Mopping the Floor,
The Casual Craftlete,
Alderberry Hill


