7.31.2013

Faux Wainscoating

I've been making some changes to our little powder bathroom, and one of the bigger changes has been, what I like to call, our faux wainscoating.  

Here is what we did:

1.  We measured.  A lot!  We measured the length for the chair rail, then we measured how large we wanted our "frames".  We also measured how far apart we wanted them, so we would know how many "frames" we needed.

2. Then we headed to the store!  
We chose our chair rail and a cheap, thin molding for the "frames".
We also picked up silicone adhesive, caulk, and 1 1/2" nails.

3. We made ALL of our cuts before doing anything in the bathroom.  I just think its easier that way!

4. We hung the chair rail, using adhesive AND nails.  Notice the level, it was our best friend for this project!! 

5. After the chair rail was up, we attached the "frames" the same way, piece by piece. We made sure to measure from the top of the base board to the bottom of the chair rail to make sure it was centered in the middle.  
We also measured the space between each "frame".


6. Next we caulked everything!

7. We painted the trim first, in Valspar's Polar White

8. And then finished by painting the walls (Valspar's Wet Cement)

I want to add it everywhere now, that's how much I'm diggin it!
The complete bathroom makeover is still to come....I'm still working on a few other things for it!

Therena
Let's Connect!

7.30.2013

Refinished Chest

I recently inherited my Grandmother's cedar chest.  It's definitely a bittersweet thing for me.  My grandma actually passed away when I was in Junior High.  When she died the chest went to my wonderful Aunt Susan.  Unfortunately, my aunt suffered from poor health for many years, and she died in April.  Because her and her husband were never able to have children, the chest came to me.  I loved my aunt, and when we moved into our current home she lived just down the street.  I already miss her terribly, so I am thrilled to have her and my grandmother's chest.  

I debated for a long time on whether or not I should refinish it, and I finally just went ahead and did it!
It was a beautiful chest before:

I really like some of the details on it:


It does have a few problems, like the chipping veneer on the bottom.  But not enough for me to strip it, so I just painted over it!!  I figured since its mine, I wouldn't care enough!

I chose Valspar's Betsy's Linen, and Martha Stewart's Metallic paint in Vintage Gold for the accents. 
 I wanted those details to stand out.
I painted the gold accents first, thinking I could get away with not having to tape...

Yeah, so after I painted the white, I had to tape, then go back and touch up the gold!

To finish, I sanded, then used Martha Stewart's Metallic Glaze:


I like the way it turned out, and although it has been refinished, it still reminds me of my aunt every time I look at it!


7.28.2013

Repurposed Armoire Update

Do you remember my repurposed armoire? 

 About a year ago I found this awesome piece on Craigslist for $30! 
Awhile ago I shared with you how I repurposed it for my kids playroom. 
(You can see the full post here)

This is how it looked then:

 Well, after awhile it started to annoy me!  The boys' lego creations became too big to fit on the small shelves, and my one year old kept getting into the nearby bookshelf and ripping all the books out!!

The more I thought about it, the more I wanted to rip it all out and redo my armoire! So I finally did! 
My thought was to make it solely for books.

I started by tearing everything out that I had previously added, then I built 2 new shelves.  I then repainted the inside.  I went with a brighter white this time, rather than cream.  I used Valspar's Polar White.

I left the doors alone, with the cork on one side, and the chalkboard on the other:


 However, I did need to figure out a place to hold the chalk/eraser.  So I took one of my thrift store crates, and screwed it into the door.  It has worked out perfectly!


 And the bottom drawers are still being used for puzzles and small baby toys

But it functions SO much better for us now, having all the books together and out of reach of little hands.  The legos moved to bedrooms, and I can still close it up when we aren't getting into it!

During demolition I was also able to keep the small shelf unit intact, so I repainted it a light gray color and changed out the knobs.  I'm thinking I might hang it in the boys' bathroom.

And that's how I repurposed my repurposed armoire!! 


7.25.2013

Thrifty Thursday: Decorating with Crates

Another thing I usually always find at the thrift stores are wooden crates.  For some reason I like to hoard them.  It is rare if I see one and don't take it home with me.  Maybe I just like them...I don't know!  But I have had fun using them around my house.  They typically cost between $1-$4.  
So I'm going to show you how I've used some of them to decorate.


 Now keep in mind, at the store they look like this:

Or something like this:


I do have to put a little bit of work into them, but usually paint does the trick!

Above my Kitchen cabinets:


Family room ladder shelf:

I added one to this shelf to fill in some empty space and give it more color:

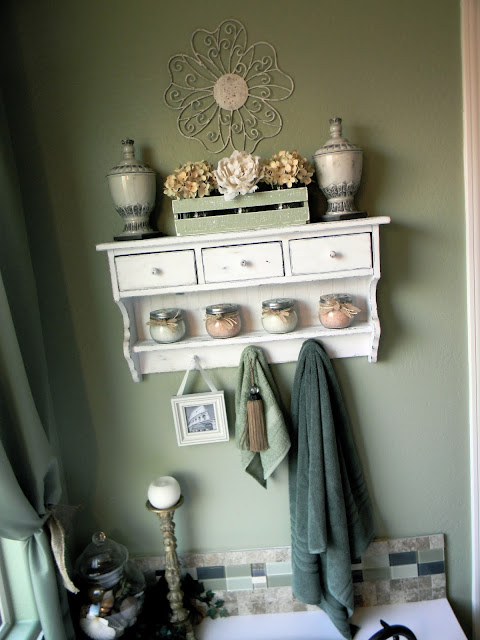
Master Bathroom:

I placed flowers in mason jars, and stuck them inside this crate:


Boys' Bathroom:


 This one sits on the counter in the boys' bathroom.  I put burlap in the bottom, and then added a bunch of random stuff...I really like this one!

Laundry Room:

I have a lot of "above the cabinet" space in my laundry room, so I keep adding more crates 
to fill in space


Awhile back I was lucky enough to find this guy!  He cost $4.00 at Goodwill!  


There was no way I was going to paint him, but I struggled trying to find a spot for him.  I finally stuck him on the hutch in my kitchen.


So next time you are at Goodwill and see an old crate, snag it like I do! lol

Related Posts Plugin for WordPress, Blogger...