4.30.2013

Table Centerpiece

When I moved into our house my parents gave us their beautiful dining room furniture.  We were THRILLED to have it!  With it, my mom gave me her centerpiece that she used on the table.  It is so pretty too.  It holds 7 candles.  However, as much as I like it, I didn't like the look of having 7 big bulky candles on it.  

A few weeks ago while I was at Garden Ridge (side note:  if you haven't been there...GO!) I came across these cute little mason jars.  They were a unique size and I thought they might be really cute to put on my centerpiece, and then put little candles inside them.

What do you think?  I think it turned out great!  It gives it more of the look I was going for!

 Here's a close-up of the jar:

 And the Final Product:


4.28.2013

My New Buffet

This dresser is the first piece of furniture I ever painted.  This is where it all began....what changed my curiosity to obsession!
  This piece came from my husband.  To give you a little history, we have only been married for two years.  We both came from previous marriages that were difficult.  Well, this dresser was given to him when he got married the first time.  Of course they had very little, and so his dear aunt gave him her old, junky dresser.  
I don't have any before pictures (because I never thought I would start a blog at this point), but I will tell you, it was GROSS!  The top was covered in stains and water damage.  None of the drawers slid well.  The outside was sticky from spills that were never wiped up.  My first thought when I saw this was "lets get rid of it!"  But there was something about it that kept me from doing so.  It had good bones, and I thought I saw some potential.  
After many hours of research, and many more hours on my knees painting and sanding, this is how it turned out:  I thought it was beautiful.  Everyone that saw it commented on it.  


These pictures were taken after we moved into our current home.  After many more painting projects!  Although I loved it, I was always on the lookout for something to replace it, something more fitting, more my style.


So when I came across this beauty on Craigslist I couldn't resist!  She was only $60!  Her two front legs were broken off, but I didn't care.  She is about 50 years old, and has all the original hardware!

The first thing I did when I got her home was wipe her down with vinegar.  This is my #1 RULE when ever I get something off Craigslist!  It not only cleans it, but it removes any odor from the furniture, including smoke.  
After that I reattached the broken legs with wood glue.  And, of course, I was too excited to get painting that I once again didn't take a before pic!  Sorry...I'll work on that!

This is her after two coats of my homemade chalk paint:  (I used Valspar's Polar White)
 I applied one more coat of paint before I sanded her and reattached the hardware.


Here is a close-up:


 Isn't she BEAUTIFUL?!!!
Here's a Side-By-Side Before and After:


Not a HUGE difference, they are both great, but the new one makes a much bolder statement!

Party Links:
Savvy Southern Style: Wow us Wednesday
Domestically Speaking: Power of Paint Party
Miss Mustard Seed: Furniture Feature Friday
The Shabby Nest: Frugal Friday

4.25.2013

Thrifty Thursday: Antique Office Chair

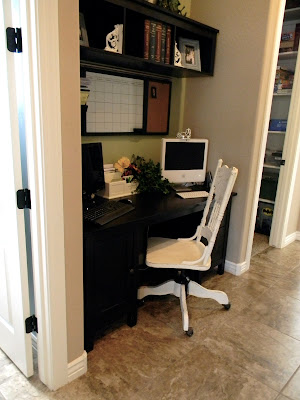
Today for Thrifty Thursday I'm going to show you my new office chair.  But I have to start with my "office".  I don't like having to designate a whole room for an office.  Since my hubs has his office at work, there is just no need for a big office in our home.  We have two computers so we needed at least a spot for a desk.  When we were building our house, one of the options was to pay big bucks for built-in cabinets in one of our hallways.  So I had the thought "maybe this nook area could work for a desk if we left it open: without cabinets.  
Here are some pics of it, and it has actually been amazing!  I can be working on stuff and have a clear view of the playroom.  However, we have to use an armless chair so it can be pushed all the way in (since it is in the hallway).  We didn't have one without arms, so my brother gladly made a "trade" with us!  Unfortunately the only good thing about his chair was that it was armless!  It is hammered, and the back has a tendency to fall off.  If you look closely at the pics you can see that it is barely hanging on!
I began to search on Craigslist and at the thrift store for an old antique chair because I thought that might be fun to have for our desk.  I kept seeing them on Craigslist for around $60 bucks! NO WAY!  I was not about to spend that on a chair!!  But I happened upon this guy at Goodwill, and he was $12!  
These were taken right after I finished sanding
When I got him home I made my  chalk paint.  I mixed 2 TBSP plaster of Paris with some water.  When the P of P was dissolved I added my paint:  for this project I used Valspar's Churchill Hotel Vanilla.  This guy took about 5 coats of paint!! He was SO old that most of his stain was gone and he just soaked up the paint.  I used my electric sander for most of it, and it easily distressed even with the five coats of paint.

 Here he is in his new home.  I am so pleased with the way he turned out!


Link Parties:


4.24.2013

Fun with Flowers

Since Spring is in the air, I was wanting to make a new wreath for my front door.  

This is the wreath I made a few months ago that has been on the door, which I love, but I wanted to add some color.  So I headed to Hobby Lobby to pick out some flowers (while they were on sale!) 
 And I went a little OVERBOARD! (like usual)
I have been loving the Hydrangia flowers lately, and I found these lovely pink ones!
This wreath took me all of 15 minutes to make:  I hot glued the flowers onto a plain "stick" wreath (I have no idea what they are actually called) but just those brown twig looking ones! I glued the flowers on first, then glued the leaves on where I wanted filler.  I had extra green material left over from the other wreath so I looped that around it, tied the bow at the top and called it good!
I had tons of flowers left over so I decided to surprise my mom with one.  Her front door is HUGE, so I made the wreath HUGE and it looks Fabulous! 

So fabulous that she asked me to make one for her pantry door.  If you remember the post about the pantry door, you probably remember it!  She wanted yellow with a burlap bow.
And she decided to photo bomb my pic! Love it! :) 
Here's a close-up
 Well, even after all those wreaths, I still had some flowers left over. Mostly because I bought too many different colors. I have had this metal basket for about 10 years, and have never known what to do with it.  When we moved into this house I stuck some fake fruit, shrubs, and burlap into it and used it on my kitchen table.  However I never LOVED it.  
Here it is:
So I played around with it and my flowers and came up with this.  
Much Better in my opinion!

And I like it way better in its new home:  It is now sitting in the little niche in our hallway. The window has been there, but I added my new creation and the scroll to the top.  Now I LOVE it!


4.22.2013

Dresser Make-Over

A few weeks ago my dear friend, Jamie, called me up and asked if I would help her paint a dresser she had.  Of course I was thrilled!  
But before we get into that I have to tell you about my friend.  I have only known her for a few years, but I love her so much!  She will always be dear to me...not only because she is just all around fabulous... but because she took care of my sweet husband when they were in Law School out in Kansas.  We weren't married then so my poor husband was single going through Law School!  Jamie was married to his best friend Johnny, and my hubs always tells me how he wouldn't have survived without them.  So when he and I started dating he introduced me to them.  And later, after we were married, he told me that he needed their approval of me!  Obviously I got it!  

So I will forever be grateful for Jamie!  She is the best!!!

Now on to the dresser!  Here is the before shot:  it was a pretty adorable dresser to begin with, but Jamie wanted it painted in a BOLD color to bring life into the room.

So together we went to Lowes and picked out this beautiful "mustard" color.  The actual name is Bungalow Gold by Valspar.  We used vaseline before we painted, then applied 3 coats of paint.  After we distressed it, we dabbed a bit of stain to the distressed edges to darken those spots.
Here is the AFTER:  

 And I love the mismatched crystal knobs!  Beautiful!

Link Parties:

4.18.2013

Thrifty Thursday: Massive Frame

I go to the thrift store alot!  I'd say a few times a week. And I never leave empty handed! So I thought I'd start a "Thrifty Thursday" to show some of the treasures I find and what I do with them.  This last weekend we took the boys and went with my parents to the classic car show in Scottsdale.  To my pleasant surprise there was a goodwill in the strip mall across the street!  While there I came upon this beauty!  

 These pictures show her true color:  nice and Gold and screaming to be painted!!  I paid $30 bucks for her, which I thought was pretty good considering her size!

And I gave her a makeover!  I used my polar white by Valspar, then sanded her down.  Much Better!!!

Here is a close-up:


 And here she is hanging on my living room wall.  Now I just need to get a picture into her!

Party Links:

4.10.2013

Refinished Cabinet

This week as I was browsing Craigslist I came across this "cabinet" (that's what I'm calling it!)  I think it was originally some type of music thing.....Idk!  But it is OLD and SOLID and I paid only $20 for it.   So I thought it might be cute to use as a type of curio cabinet.

This poor thing was in bad shape, but I knew I was going to paint her.

 There were 2 shelves in it, but the top one had no center, and the bottom one had a large round opening it it!  You can kinda see it in this picture.  I ripped both of those out and added some of my pallet wood to create two rustic looking shelves.

Here is the finished product! I used my go-to white color:  Valspar's Polar White in Satin.  I made my homemade chalk paint with it.  Then I just distressed it!  I wanted to keep the shelves rustic looking so I stained them a walnut color instead of painting them.

I am LOVING the way my "cabinet" is looking in the corner of my living room!

Party Links:
Related Posts Plugin for WordPress, Blogger...